 |
START NEWS SITE CONTENT РУССКИЙ orders for e-books, as well as questions about modeling, design and
tailoring technology should be sent to |
women's |

NEW vol 7. Transfer of breast and waist tucks |

vol 5. Basic patterns of products with a set-in sleeve |
 vol 6. Modeling of collars, design of necks and fasteners
 |
vol 8. Modeling of set-in sleeves |
women's |
vol 1. Basic patterns of skirts. Straight, narrowed and extended skirts | vol 2. Pleated and tapered skirts | vol 3. Skirts are wedged, with flounces, with petals, with draperies | vol 4. Trousers |
men's |
vol 1. Shirts and underpants | vol 2. Trousers | vol 3. Denim suit | |
children's |
vol 1. Underwear | vol 2. Light clothing |
Ludmila Serova
Basic the technical drawing and the technical design of bra
This technical drawing is used for several years in the "Author's school Lyudmila Serova cutting and sewing". The base drawing is used for modeling bras, corsets, tight bodices for wedding and evening dresses. On Photos 1, 2 and 3 show sundress with bodice, constructed on this base drawing (work Tatyana Dyachenko).
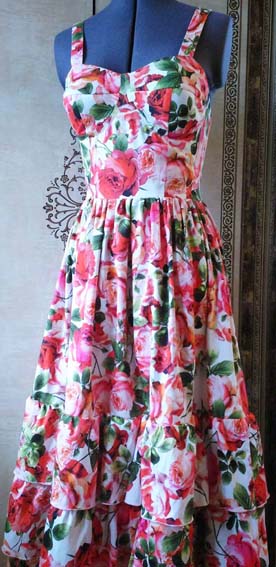
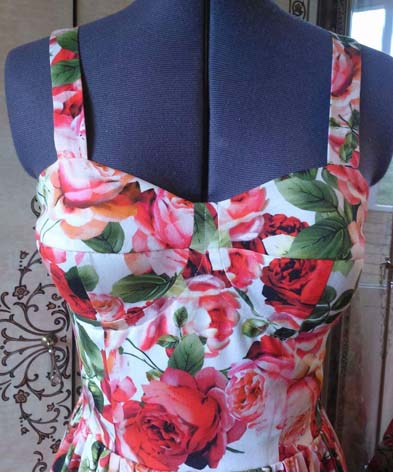
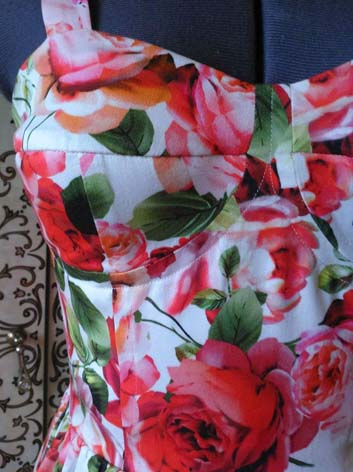
Photo 1 Photo 2 Photo 3
The article considers only the basic drawing bra. To make the actual products after perform drawing on base measurements of specific the women, it is necessary to perform modeling of bra, including to choose the form of the cups.
1. The system of measurements
Measurements shall be carried out on a woman clad in lingerie, but measurement can be carried out without a bra if breasts keeps the shape. Measurements shall be made using a tailor's cm-tape. The quality of the fit of clothing on the body depends largely on the accuracy of measurements.
Before the measurements, you must provide for themselves a notepad and pencil to record. Every measurement we recommend that you take a few times to compare the measurement results. If the bra with a belt to waist before measurements the waist line to fix the rubber band. Technical drawing must be performed on a graph paper in order to ensure the parallelism between the lines and not distort the angles. It is recommended to make patterns from tracing paper.
The table shows the measuring system to build the basic patterns of bra.
| Name of measure | Symbol | How make the measurement |
| 1. Half the girth of the chest (2) | Hgc2 | Measure via cm-tape the distance around the body. Cm-tape goes back horizontally through the scapulae and through the rear corners of the underarm, then through highest points of women's breasts. The value is written in half size. |
| 2. Half the girth of the chest (4) | Hgc4 | Measure via cm-tape the distance horizontally around the torso under the base of women's breasts. The value is written in half size. |
| 3. Half the girth of the waist | Hgw | Measure via cm-tape the distance around the waist, which marked with a rubber band or a cord. The value is written in half size. |
| 4. Distance between highest points of the female breast | Dhp | Measure via cm-tape the distance horizontally in a straight line between highest points of women's breasts. The value is written in half size. |
| 5. Half of the vertical arc | Hva | Measure via cm-tape the distance from the base of the right breast from below up to highest points of women's breasts. The value is written completely. |
| 6. Belt width | Bw | Measure via cm-tape the distance from the base of the right breast to desired width of belt. The value is written completely. |
Example of the technical drawing is made for bust having the following measurements (cm):
Hgc2 = 48.0 Hgc4 = 42.5 Hgw = 38.0 Dhp = 10.0 Hva = 10.0
Bw = 3.0 (for short bra)
Bw = 20.0 (for bra, reaching to the waist line).
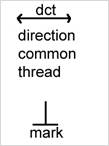
The symbols in the figures:
2. Drawing the grid (Fig. 1).
2.1. Draw a rectangle ABCD:
- the width of the rectangle AB = CD = Hgc2 / 2 – 3.0 = 48.0 / 2 – 3.0 = 21.0 cm
- the height of the rectangle AD = BC = Hva * 2 = 10.0 * 2 = 20.0 cm
2.2. Measure the distance Ва = Dhp – 1.0 = 10.0 – 1.0 = 9.0 cm from the point B to the left, draw the vertical dotted line from point a to the intersection with the line DC.
2.3. Divide the line segment AD into two equal parts and from the point of dividing the left horizontally draw a dotted line be up to the intersection with the line BC.
2.4. Mark the intersection point of the line segments ad and be as O.
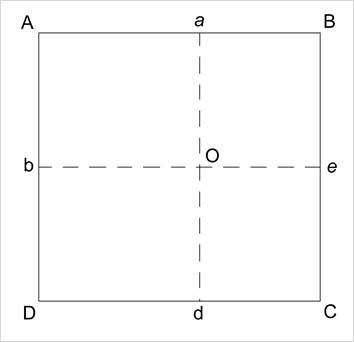
Fig. 1
3. Drawing a cup of bra (Fig. 2).
3.1. Calculate size first tuck: Hgc2 / 10 + 1.2 = 48.0 / 10 + 1.2 = 6.0 cm, half size 6.0 / 2 = 3.0 cm. For busts that have Hgc2 more 56.0 cm, not to add 1.2 cm.
3.2. Draw 4 tuck, size tucks:
aa1 = aa2 = 3.0 cm
ee1 = ee2 = 3.0 cm
dd1 = dd2 = 3.0 cm
bb1 = bb2 = 3.0 cm
Connect by straight lines points a1, a2, e1, e2,
d1, d2, b1, b2 with
point O.
3.3. Measure the distance 3.0÷4.0 cm from point A down the line AD, mark point as k.
3.4. Measure the distance 1.0÷2.0 cm right horizontal from point k right horizontal, mark point as k1.
3.5. Measure distance 3.0÷4.0 cm from point B down the line BC, mark point as k2.
3.6. Connect the point k1 by straight lines with points a1 and b1, draw lines k1a1 and draw lines k1b1.
3.7. Connect the point k2 by straight line with point a2, draw line k2a2.
3.8. Measure the distance 1.0 cm from point D right, mark point as k3.
3.9. Measure the distance 1.0 cm from point k3 vertically upwards, mark point as k4.
3.10. Connect the point k4 by straight line with point b2, draw line k4b2.
3.11. Connect the point k4 by straight line with point d1, draw line k4d1.
3.12. Draw a bisector of angle d2Ce2 , on the bisector measure distance of a point C 3.0÷3.5 cm, mark point as k5.
3.13. Draw a curve smooth line through points e2 k5 d2.
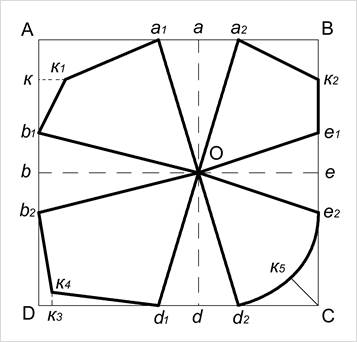
Fig. 2
4. Drawing the front piece of the belt bra (Fig. 3).
4.1. Make line segment from a point е2 upwards on line е2е1 having a size equal a line segment е1к2, mark a point as P.
4.2. Measure the distance 0.5÷1.0 cm from the point P right horizontally, mark point as P1. If clasp is ahead, measure distance 1.0 cm or more, depending on the desired width of the clasp.
4.3. Draw a vertical straight line P1P3 from the point P1 down. Point P3 is located below the line DC to distance the width of the belt under the breast, the minimum width is 3.0 cm, the maximum width - up to the waist.
4.4. Draw a straight line P3P4 from the point P3 left horizontally having size equal PP1 + Cd2 + d1k4 = 1.0 + 6.0 + 8.0 = 15.0 cm.
4.5. Draw up a perpendicular P4P5 from the point P4 to the intersection with the line CD.
4.6. Draw the contour line of the belt under the breast through points P e2 k5 d2 d1 P5 P4 P3 P1 P.
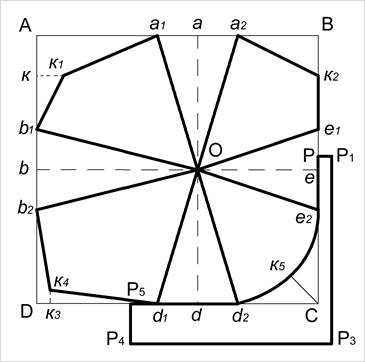
Fig. 3
5. Drawing of side belt bra (Fig. 4).
5.1. Draw a rectangle A1B1C1D1.
A1B1 = D1C1 = Hgc4 - P4P3 = 42.5 – 15.0 = 27.5 cm
A1D1 = B1C1 = P5P4 + k4b2 + b1k1 = 3.0 + 6.0 + 4.0 = 13.0 cm
5.2. Measure the distance 3.0 cm from point D1 up line D1A1, mark point as P6.
5.3. Connect points P6 and B1 by straight dotted line, this line divide into 3 parts, from the right point of division on the perpendicular down measure distance 1.0 cm, from the left point down measure distance 0.5 cm.
5.4. Connect points B1 (1,0) (0,5) P6 by curve smooth line.
5.5. Measure the distance 4.0÷5.0 cm from the point P6 to the right along the smooth curve line and draw mark. To the right of this mark for belt bra will be sewn straps of a bra.
5.6. You can reduce line segment D1C1 for width of clasps, if clasp is back of bra.
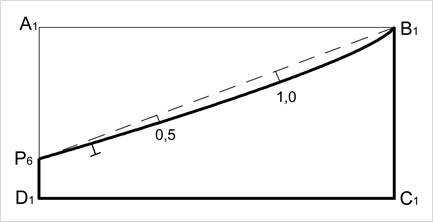
Fig. 4
6. Modeling of bra with a сup of three lobes (Fig. 5, 6, 7).
6.1. Divided each line side lobes b1O, Oe1, b2O, Oe2, Od1, Od2 into two equal parts, define the deflection in each points of dividing on distance 0.3÷0.5 cm. Draw smooth curve lines of side lobes through these points of deflection.
6.2. Close a tuck a1Oa2 .
6.3. Define the upper part of the cup of bra via contour line through points O b1 k1 a k2 e1 O. Specify the direction of the common thread (dct) by horizontal. Cut out the two pieces bra of the base fabric and the two pieces bra of the lining fabric.
6.4. Define the side lower lobe cup of bra via contour line through points O d1 k4 b2 O. Specify the direction of the common thread (dct) by horizontal. Cut out the two pieces bra of the base fabric and the two pieces bra of the lining fabric.
6.5. Define the front lower lobe cup of bra via contour line through points O d2 e2 O. Specify the direction of the common thread (dct) by line d2e2. Cut out the two pieces bra of the base fabric and the two pieces bra of the lining fabric.
6.6. Define the front piece of the belt bra via contour line through points P P1 P3 P4 P5 P (Fig. 7). Specify the direction of the common thread (dct) by horizontal. Cut out one piece bra of the base fabric and one piece bra of the lining fabric.
6.7. Define the side piece of belt bra via contour line through points P6 B1 C1 D1 P6 (Fig. 7). Specify the direction of the common thread (dct) by horizontal. Cut out two pieces bra of the base fabric.
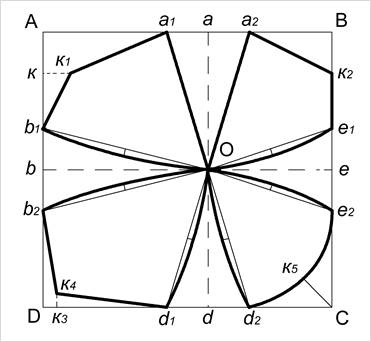
Fig. 5
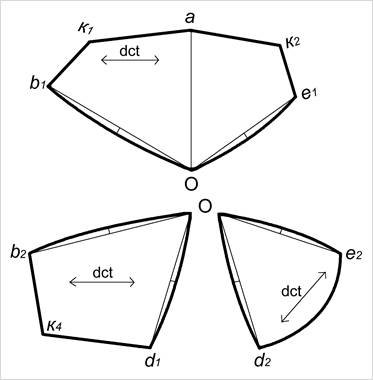
Fig. 6
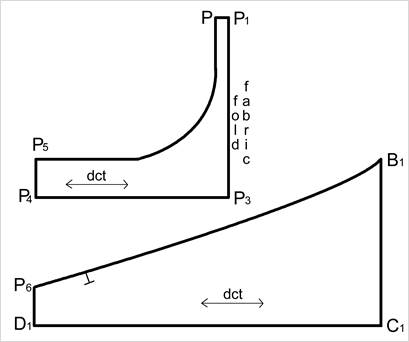
Fig. 7
7. Modeling of the cup bra having two pieces and one vertical seam (Fig. 8,9).
7.1. Divide each line side lobes of bra a1O, Od1, a2O, Od2 into two equal parts; define the deflection in each point of dividing on distance 0.3÷0.5 cm. Draw smooth curve lines of side lobes through these deflection points.
7.2. Close tucks b1Ob2 and e1Oe2.
7.3. Define the side lobe of cup bra via contour line through points O a1 b k4 d1 O. Specify the direction of the common thread (dct) by line k4d1. Cut out two pieces bra of the base fabric and two pieces bra of the lining fabric.
7.4. Define the front lobe of cup bra via contour line through points O a2 k2 e d2 O. Specify the direction of the common thread (dct) by horizontal. Cut out two pieces bra of the base fabric and two pieces bra of the lining fabric.
7.5. Drawing belt of bra, see Fig. 7.
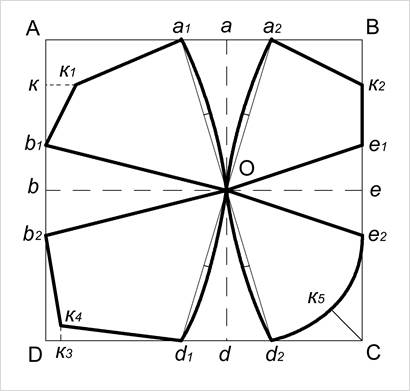
Fig. 8
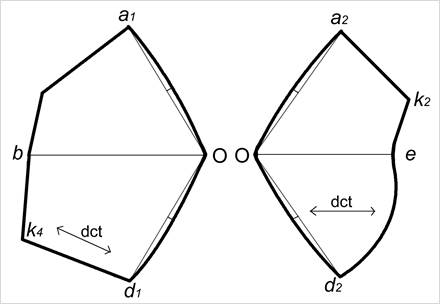
Fig. 9
8. Modeling of the belt of bra having size up to the waist line (Fig. 10, 11)
8.1. Calculate total width of tucks (TWT) on the waist line
TWT = Hgc4 - Hgw = 42.5 – 38.0 = 4.5 cm
8.2. Distribute TWT as follows:
- in a side seam at the waist line 3.0 cm (from the front part of the belt 1.5 cm and from
side part of the belt 1.5 cm),
- in the middle seam on the back 1.5 cm.
For large values of TWT on the line in the middle P1P3
to perform the seam and to remove part of TWT in this seam.
8.3. Make the width of the belt P5P4 under the chest to the waist equal Bw = 20.0 cm (Fig. 10).
8.4. Calculate the width of the side part of the belt (see paragraph 5).
A1D1 = B1C1 = P5P4 + k4b2 + b1k1 = 20.0 + 6.0 + 4.0 = 30.0 cm
8.5. Drawing the tucks at the waist line:
- measure the distance 1.5 cm from the point P4 right, mark a point as M,
- point M connect with point P5 by straight line,
- measure the distance 1.5 cm from the point C1 left, mark a point as M1,
point M1 connect with point B1, by straight line,
- measure the distance 1.5 cm from the point D1 right, mark a point as M2,
point M2 connect with point P6, by straight line,
8.6. Define the front part of the belt bra via contour line through points P P1 P3 M P5 P (Fig.11). Specify the direction of the common thread (dct) by horizontal. Cut out one piece bra of the base fabric and one piece of the lining fabric.
8.7. Define the side part belt bra via contour line through points B1 M1 M2 P6 B1. Specify the direction of the common thread (dct) by horizontal. Cut out two pieces bra of the base fabric.
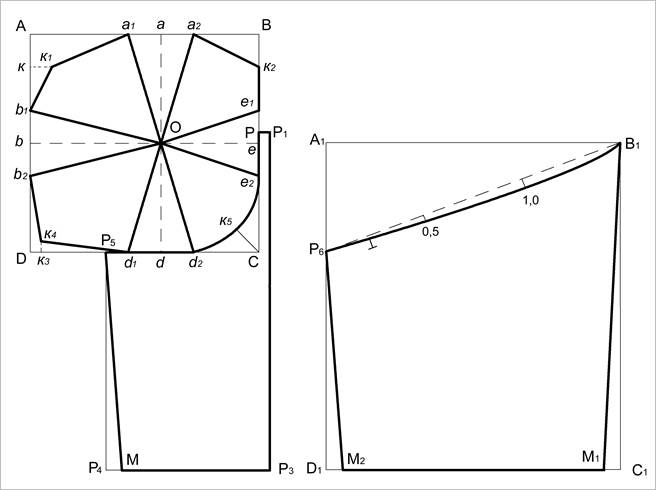
Fig. 10
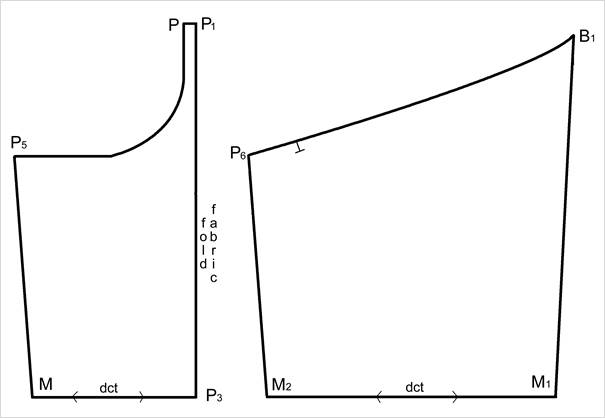
Fig. 11
beginning contents of the site
Copyright © Ludmila Serova
Last modified: 17.06.2020